Make WorldBox mods with Claude Code
Your goofy guide WBStupid walks you from zero to a published mod, the right way: with effort, your own ideas, and honest AI disclosure.
⚠️ The one rule you can never skip: always disclose AI.

Hi, I'm WBStupid!

Hiya! I'm WBStupid, your modding buddy!
By the end of this guide you'll have made a real WorldBox mod with Claude Code.
It says "Hello World!" in the game. Small? Yes. YOURS? Also yes!
This guide is for WorldBox players who want to make mods but don't know much (or any!) code. You'll work with Claude Code, an AI coding assistant that lives in the Claude desktop app and can read and write files on your computer.
We'll set everything up, make a tiny Hello World mod together, and then talk about what really matters: making good mods, respecting other creators, and always being honest that AI helped.
What you need
Before we build, let's pack the backpack!
Five things. That's it. Even I can count to five. Mostly.
A Claude plan that includes Claude Code
Claude Code in the desktop app needs a paid plan: Pro, Max, Team or Enterprise. Get the Claude desktop app from the official Claude Code desktop guide, sign in and open the Code tab. If it asks you to upgrade, your plan doesn't include Claude Code yet. On Pro and Max, your usage limits are shared between normal Claude chats and Claude Code.
WorldBox on Steam
This guide uses the Steam version on PC. Steam also gives you the Workshop, where you can share your mod later.
NeoModLoader (NML)
NML is the mod loader that loads code mods into WorldBox. The easy way is to subscribe to the NML item on the Steam Workshop, which keeps it updated. Or download NeoModLoader.dll from its official GitHub page and put it in worldbox_Data/StreamingAssets/mods. Either way, turn on Experimental Mode in WorldBox's settings, or mods won't load. If your mods ever stop loading, check that it's still on.
A code reader: ILSpy or dnSpyEx
These let you (and Claude) peek inside WorldBox's own code to see how things work. The official NML tutorial recommends ILSpy or dnSpyEx. You only read with them, you never change the game.
A pixel-art editor
WorldBox is pixel art, so your mod's icon, units and items will be too. Aseprite (paid), LibreSprite (free) or Piskel (free, in your browser) all work.
Your modding folder
Every great mod starts with... a folder! Exciting, right?
Make one home folder for all your mods, with one folder inside it for each mod.
Pick a place that's easy to find, like Documents\My WorldBox Mods. Keep it outside the game folder, so a game update or reinstall can never delete your work. Use simple names with no special characters, like HelloWorld.
Setting up Claude Code desktop
Time to meet Claude! Open the Claude app and click the Code tab.
Pick Local, click Select folder, and choose your mod's folder.
Then tell Claude where WorldBox lives so it can read the game. It'll ask you first!
- Open the Claude desktop app, sign in, and click the Code tab at the top.
- Choose Local (so Claude works on your own computer), click Select folder, and pick your mod folder, for example
My WorldBox Mods\HelloWorld. - Pick a permission mode with the selector next to the send button. Start with Manual: Claude asks before it edits a file or runs a command, and shows you exactly what will change. Once you're comfortable, Accept edits lets file edits through without asking. Leave Bypass permissions alone.
- Tell Claude where WorldBox is installed so it can read the game's files, for example: "WorldBox is installed in C:\Program Files (x86)\Steam\steamapps\common\worldbox. Please read it when you need to." Claude asks your permission before it reads a folder outside your project. Say yes.
- Give Claude the game's code to read. Open ILSpy, choose File → Open, and open
worldbox\worldbox_Data\Managed\Assembly-CSharp.dll. Select it in the list, choose File → Save Code, and save it into a new folder such asMy WorldBox Mods\_game_code. Then tell Claude: "The decompiled WorldBox code is in My WorldBox Mods\_game_code. Read it to check how the game works." Claude can't read the.dllby itself, but it reads these.csfiles easily. Do it again after big game updates.
You can type @ followed by a file name to point Claude at a specific file, and drag images straight into the chat to show Claude what you mean.
Your first mod: Hello World
Let's make a mod! Ask Claude for a Hello World mod for NeoModLoader.
Then copy your mod folder into WorldBox's Mods folder and start the game.
Boom! Hello World! I'm so proud I could cry. Pixel tears.
1. Ask Claude to make it
In your Claude Code session (folder: HelloWorld), type something like:
Make a tiny WorldBox mod for NeoModLoader called "Hello World".
Every time a world finishes loading, show the in-game tip "Hello World!".
Create mod.json, the C# code in a Code folder, and use icon.png as the icon.
Look at the decompiled game code in my _game_code folder to find the right way to show a tip.
Claude will look around, then propose files. Read what it's about to do, and accept the changes.
2. What's in the folder
Here's the real mod.json of our example:
{
    "name": "Hello World",
    "author": "Triickstr",
    "version": "1.0.0",
    "description": "Says Hello World! every time a world loads. Made with AI: code written by Claude Code.",
    "iconPath": "icon.png",
    "targetGameBuild": 719
}
And its whole Code/Main.cs:
using NeoModLoader.api;
using UnityEngine;

namespace HelloWorld{
    class Main : BasicMod<Main>{
        private static bool wasLoading = true;

        protected override void OnModLoad(){
            Debug.Log("HelloWorld: loaded");
        }

        void Update(){
            if(!global::Config.game_loaded){
                return;
            }
            bool loading = SmoothLoader.isLoading();
            if(wasLoading && !loading){
                WorldTip.showNow("Hello World!", false, "top", 6f);
                Debug.Log("HelloWorld: said hello");
            }
            wasLoading = loading;
        }
    }
}icon.png with your own square pixel-art picture (keep the name, or change "iconPath" in mod.json to match). Change the name or description: edit mod.json, or just ask Claude to.3. Put it in the game
Copy the whole HelloWorld folder into WorldBox's Mods folder:
...\steamapps\common\worldbox\Mods\HelloWorldYou can also ask Claude to copy it there for you. NeoModLoader builds the mod from the Code folder every time the game starts, so after any change, restart WorldBox.
4. See it work
Start WorldBox (Experimental Mode on), open NeoModLoader's mod list in the game to see your mod with its icon, and look at the top of the screen when your world finishes loading: "Hello World!" pops up. It pops up again every time you load or make a world. You did it!
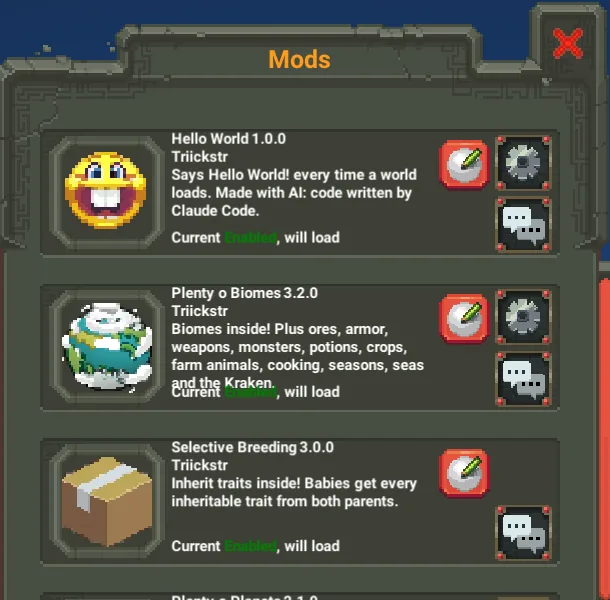
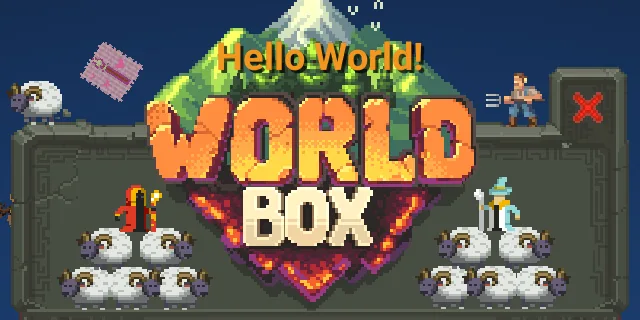
Mods (not a folder inside a folder), and mod.json is in the top of your mod folder. Then ask Claude: "My mod isn't loading. Here's what I see..." and describe it, or paste the error.Prompting for quality, not slop
Big secret: a good mod is NOT one prompt.
You ask, you test it in the game, you fix it. Then again. And again!
Way less work than coding it all yourself. But it still takes real time and effort.
How to prompt like a pro
- Be specific. Say what it is, where it shows up in the game, and how it should look and feel. "A new creature" is vague. "A frost wolf that spawns in snow biomes, hunts sheep, and freezes the ground it walks on" is something Claude can build.
- Describe gameplay, not just a name. How should players use it? What makes it fun? What should it NOT do?
- Give references and assets. Drag in your sprites, a sketch, or a screenshot of what you mean (more in the next chapter).
- Build in small steps. Get one thing working, test it, then add the next. Huge "make everything" prompts make huge messes.
- Test in the game every time, and tell Claude exactly what happened: what you did, what you expected, what you saw.
- Ask Claude to explain. "Why did you do it this way?" helps you learn and catches mistakes.
- Review before you accept. You're the mod's author. Claude is your helper, not your replacement.
make me a cool mod with lots of stuff
Add a "Lantern" building for human cities. It uses my lantern.png sprite (attached), costs 5 wood and 2 gold, and lights up nearby tiles at night. Start with just the building appearing; we'll do the light next.
it's broken fix it
When I place the Lantern, the game shows a red error in the log: "NullReferenceException in Lantern.update". It happens only at night. Can you find why?
Good or Slop? Quiz time!
WBStupid shows you an idea. You decide: is it Good or Slop?
"I'll ask Claude for the whole mod in one prompt and upload it right away."
Answer: Slop. Good mods take many rounds of prompting, testing and fixing.
"I'll give Claude my own sprites and describe how the creature behaves, then test and fix it over several rounds."
Answer: Good. Your assets, a clear description and real testing.
"I'll feed Claude someone else's mod and just change the name."
Answer: Slop. Never use other people's mods without permission, and be original.
"I'll mark my mod as made with AI on every site I upload it to."
Answer: Good. Always disclose AI. Always.
"Prompt: make it better."
Answer: Slop. Better how? Say exactly what to change.
"Prompt: the knights spawn on water tiles. They should only spawn on land. Can you fix the spawn check?"
Answer: Good. Clear problem, clear goal.
"I'll grab any picture from the internet for my mod's art. It's online, so it's free."
Answer: Slop. Check each asset's licence, and give credit.
"Before uploading, I'll play my mod for a while and fix the bugs I find."
Answer: Good. Test before you share.
Bring your own assets
AI is great at code, and it can help with art too.
But the best mods come prepared: your own sprites, sounds and ideas!
The more you bring, the better your mod turns out.
Claude writes code really well, and it can help with assets. But you'll always get a better, more original mod if you come prepared with your own sprites, icons, sounds and a clear idea of the look you want. Drag them into the chat so Claude can wire them in.
Where to find assets
- itch.io game assets: tons of free and paid packs. Every pack has its own licence. Read it, because many allow use in projects but forbid sharing the assets on their own.
- OpenGameArt: each upload shows its licence (CC0, CC-BY and others). CC-BY means you must credit the artist.
- Kenney: a huge free library under CC0 (use it anywhere; credit is appreciated but not required).
Respect and originality

Okay. Serious face. This one matters.
Never feed someone else's mod to the AI without their permission.
Don't use another mod to recreate it. Make YOUR ideas.
- Never give someone else's mod to the AI (their code, art or files) unless the author said yes. Modders put a lot of work into their mods, and they decide what happens to them.
- Don't recreate other people's mods. Using AI to copy a mod's features or "make my own version" of it is still copying.
- Be original. The WorldBox community already has those mods. Yours should bring something new: your idea, your style, your twist.
- Want to build on someone's work? Ask them first, follow their terms, and credit them clearly.
Publishing your mod
Your mod works? You tested it lots? Time to share it with the world!
Steam Workshop, Nexus Mods and GameBanana are the big three.
And wherever you upload, you disclose AI. Chapter 10 tells you how!
Before you upload
- Play it. Break it. Fix it. Then play it again.
- Write a clear description: what it adds, how to use it, which mods it needs (and NeoModLoader!), and known issues.
- Take good screenshots in the game, and credit any artists whose assets you used.
- Decide on a version number (like
1.0.0) and keep it inmod.json.
Steam Workshop (through NeoModLoader)
NeoModLoader has a built-in Workshop uploader. Put your mod in worldbox/Mods, start the game, and open the NML mod list. Click your loaded mod's icon quickly about 8 times (each click toggles it, so 8 leaves it as it was), then wait a few seconds: the Upload Mod window opens. To update an existing item, paste its File ID there.
- Your
icon.pngbecomes the Workshop preview picture, and Steam limits previews to 1 MB. - Get verified first. Uploads from NML-verified creators get the "Mod" tag, and NML loads those automatically for subscribers. Uploads from creators who aren't verified are tagged "Unverified Mod" and don't load automatically for the people who subscribe. NML verifies you through its Discord or GitHub; ask in the NML community how.
- If your mod needs another mod, add it under Required Items on your Workshop page.
Nexus Mods and GameBanana (as a ZIP)
- Right-click your mod folder → Compress to ZIP. Zip the folder itself, so players can extract it straight into
worldbox/Mods. - Make an account, find WorldBox on the site, and upload the ZIP with your description and screenshots.
- Tell players where to put it: "Extract into WorldBox/Mods. Needs NeoModLoader and Experimental Mode."
- Follow each site's upload rules, and use their AI tags (next chapter!).
ALWAYS disclose AI
This is the most important page in the whole guide.
If AI helped make your mod, you SAY SO. Always. Always. ALWAYS.
On every site, every upload, every update. No exceptions!
Why it matters
- Players deserve to know how a mod was made, and many care a lot.
- It protects the community. Honest labels keep trust between modders, players and the sites that host mods.
- It protects you. Being upfront from day one means no "gotcha" later.
Where to say it
- Nexus Mods: Nexus has generative-AI tags with three categories. AI-Generated Content covers AI-made code, UI, voices, music and in-game assets. That's a mod whose code Claude wrote. AI Media covers AI-made thumbnails, videos and page text. AI Assisted covers mostly-your-own work with limited AI help. Pick the right one: Nexus moderates mods that aren't tagged correctly.
- Steam Workshop: there's no AI tag for Workshop items, so put it in the first lines of your description where everyone sees it.
- GameBanana: check GameBanana's submission rules for your section, and state it clearly at the top of your description.
- Everywhere else: Discord posts, videos, screenshots of your mod page. Same rule.
A ready-made disclosure line
Copy it, then edit it so it's true for YOUR mod:
Made with AI: this mod's code was written by AI (Claude Code).
The idea, design, testing and [art / sprites] are my own [or: art by NAME, used with permission / under LICENCE].
On Nexus Mods, a mod whose code Claude wrote also gets the AI-Generated Content tag.
Go make something!
You did it! You know the whole adventure now!
Take your time, bring your own ideas, test a LOT, and always disclose AI.
Now go make the WorldBox mod only YOU could make. I believe in you!
Your checklist for every mod
- One folder per mod, backed up.
- Claude Code session on that folder, with WorldBox readable.
- Small steps: prompt → test in the game → fix → repeat.
- Your own assets, or properly licensed and credited ones.
- Original ideas. No feeding other people's mods to the AI without permission.
- Tested a lot before uploading.
- AI disclosed, clearly, on every site.